Olympus LS-20M Media Recorder Reviewed
The Olympus LS-20M portable recorder combines high quality audio recording with the ability to capture video. Carl gets hands-on with the latest in the range of Olympus recorders.
Hollywood In Your Pocket:
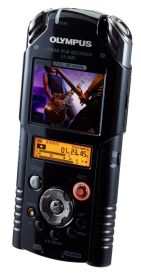 When we first laid eyes on this one, we thought it was possibly a phone, handheld television or a Dictaphone. We were surprised to learn in fact this is the latest of the Olympus LS family. With the same sort of depth as an iPhone but a little longer and not quite as wide, this was easy to mistake for a phone, but in fact is a high spec audio and video recorder. With a sleek, black, slim line design, this has two screens on it, one being a visual monitor for the filming and the other screen dedicated to the audio information being captured, such as recording level, time and battery life.
We had an interesting conversation with a rather imaginative friend of ours who on seeing it remarked on how cool it would be to use as a spy camera demonstrating how easily this could be hidden to capture some secret rendezvous or some other form of espionage one might be required to undergo. That aside the HD video 1920 x 1080P (30fps) and high quality audio of 24bit / 96kHz PCM makes what this is capable of incredibly good quality.
The application and use of this advanced tool really has little to no limitations. In reality this is capable of capturing life. Although it must be said that unlike some of the Olympus products we have come across, this one is not one of their water resistant ones and we're not too sure how much of a bashing it would take. Having said that, this is ideal for most other events, meetings, gigs, making home movies, capturing sports days, special events... the list goes on.
We wanted to put the image stabilizer to the test by using it when we went trampolining. The user interface and design layout are both intuitive and user friendly. The top front edge houses the camera lens and two microphones for capturing stereo sound although the microphone array appears to be a variation of the A, B or spaced pair technique as opposed to devices such as the voice-only Olympus LS-10 and LS-11 which appeared to be utilising some sort of O.R.T.F. technique.
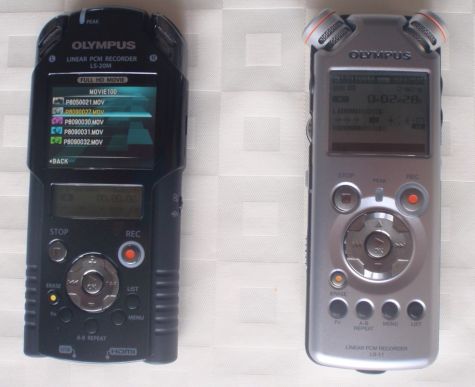
The LS-20M next to the LS-11
What we found interesting was the way you hold the device for filming unlike so many phone cameras where you hold the device vertically to capture images this one you hold horizontally, we liked this approach and rightly or wrongly agreed that it felt more stable when using it.
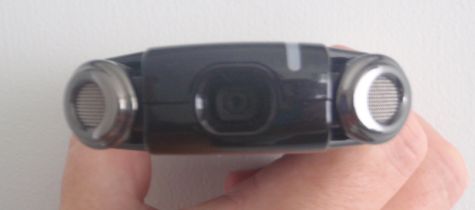
The LS-20M camera lens and microphones
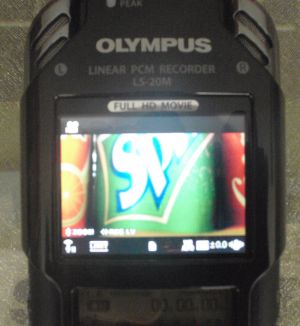
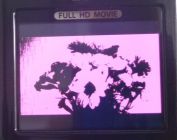
The screen is mounted on the front face of the device and gives a very clear representation of the images we found this a really convenient way of monitoring and the bonus of the audio monitoring screen below made it very easy to simultaneously film and monitor audio levels. The controls for both, just below the two screens, are easy to access and adjust with little to no effect on your filming i.e. effecting camera angels etc.. and consist of the usual play, record, stop, forward, rewind, volume up and down controls with menu, function, A-B repeat, erase and list buttons.
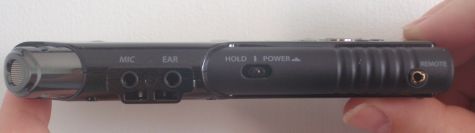
On the left side you find a variety of very handy features including 3.5mm input for an auxiliary microphone/line input, 3.5mm headphone socket for monitoring audio, the power on switch including a hold position to prevent accidental power-up or down of the device pre/post recording and a remote socket to control the device from a remote position (controller not included).
The right hand side has the neatly concealed cover for inserting SD cards and below that the function/mode switch for selecting between Record mode (just sound) or Movie mode (sound and film).
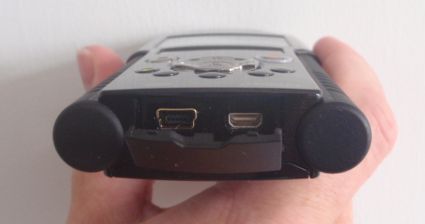
The bottom edge houses the connection points for the mini USB and HDMI sockets, for data transfer and charging the device (assuming the computer can accommodate the format), again neatly covered by a little door adding to the aesthetic beauty of the product with functionality, you know you're holding a quality product by the finishing touches.
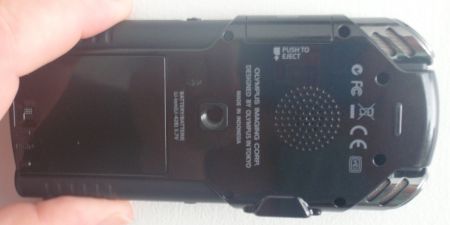
The underside is where the rechargeable battery compartment and small but useful speaker for quick and easy playback reference monitoring of audio can be found, especially handy when on location - This is a feature we've found considerably helpful when using the LS-11 for location interviews (Check out our 'Gadget Show Live 2011' special to hear audio recorded at the show on the Olympus LS-11).
There is also the optional stand hole or 'tripod mount', as identified in the instructions, the tripod is not included. This is great if you want to avoid any accidental handling sounds but especially useful if you are filming from a fixed position, like filming a stage show.
Being that most of the team are complete novices to the world of capturing film, this new world of opportunities opened up by the LS-20 was a little worrying we predicted that we would make all the beginners mistakes and whatever we produced would be silly and rough. You know typical amateur home video standard, full of boring bits and poor camera angles and all the other cringe worthy visuals you expect to endure on playback the sort of film that has 20 seconds of good stuff stretched over a 10 minutes recording. Fortunately one of the quick easy features of the camera we enjoyed was the ability to playback the video marking points 'start' and 'end' to edit out. This meant having identified the rubbish you could remove it before showing your handy work off and people were then instantaneously impressed by your slick. Obviously the screen made it easy to capture the right angle and where required you could do the same image from a different angle over and over until you got the one you wanted and then edit out the others.
It also has some cool effects that can be applied to your filming including a retro pin-hole camera effect, a sketch effect and some funky colour filters.


Let's try it.
1. CHARGING: First having taken the device out of the box, insert the Lithium-ion battery (provided) and then attach the mini USB to the base of the recorder and the other end to either a PC or the AC adapter (provided) to charge the battery. This takes approximately 2 hours. The screen will indicate when the battery is full.
2. POWER-UP: Now charged and ready to go holding the device the right way up slide the power switch on the left-hand side towards you. Both screens will light up and it will make a pleasant little sound. The top screen will display 'Olympus' soon followed by 'Please wait' and then the screen will change to the movie mode screen with 'MOVIE100' at the top (so long as the selector switch on the right-hand side is on the movie setting).
3. RECORDING: Simply press the 'REC' button on the lower face and the upper screen now displays whatever happens to be in front of the lens and the outside of the 'REC' button flashes indicating that the recorder is in record standby mode. Press the 'REC' button a second time and you're off. just point the lens at the images you wish to capture and both audio and visuals will be recorded. Having completed your recording simply press the 'STOP' button 'Please wait' will appear the screen then the screen will display the file you have created with a numerical value.
4. PLAYBACK: The last thing you have recorded will now be highlighted simply press the 'OK/Play' button to view your work of art. That was easy.
5. SIMPLE EDIT: If you would like to edit out some elements from your recording it is a simple case of pressing 'OK/play' then at the point you want to start the edit you press the 'ERASE' button and on the lower screen 'ERASE START' appears then at the point you want to keep the recording press 'ERASE' for a second time the lower screen starts to flash alternating between 'Start point and End point' appears on the lower screen. Press the 'ERASE' button for a third time and then the lower screen displays 'Partial Erase!' followed by 'Partial erase complete' It's done.
6. PLAYBACK EDITED VERSION: Simply press the 'OK/Play' button and watch your edited version on the screen.
Some other helpful features:
Effects can be used on your recordings by selecting the appropriate effect prior to recording in the 'Menu' options under the heading of 'Recording Settings' where you'll find amongst other things 'Magic Movie' here you can select one of several things and monitor the effect on the upper screen before making your choice. We were particularly impressed with the devices ability to be able to independently adjust the audio recording volume also found under the 'Menu' for the option to make it manual as opposed to automatic but this means that the record level can be adjusted during the filming process using the easy access '+ or -' buttons on the front face of the unit.
Summary
Here at FrequencyCast, we are all virgins to the world of filming, video and camcorders but we loved this because we could achieve results instantaneously with the device alone and know that with a little effort, planning and practice we could capture some images we'd be really happy with, definitely a device for all. The quality ensures that professionals will not be unhappy with the results, students and lecturers could make use of one when capturing video evidence of course work and they are also quick and easy to use for capturing the muse, taking notes and putting down ideas. Musicians can create both video and audio for their demos all in one take and even add funky effects to the images to enhance the performance.
Budding filmmakers can create home movies and with the right editing packages will have the appropriate raw material to both develop and improve their skills. We just keep on seeing so many good uses for this and with the option to use it as either a video/audio recorder or just audio means that it makes sense for so many in a working capacity from secretaries, doctors, building surveyors etc... Being able to provide high quality video evidence representing visual detail to information as required in conjunction with audio documentary styled reports, and of course the ultimate proud parent would be pleased as punch to be able to have access to one of these at all times, as its small sleek design easily fits in any of mum's and dad's pockets or handbag/man-bag.
What's in the box?
- LS-20 Linear PCM Recorder
- Lithium-ion battery
- USB AC adapter
- USB cable
- 2GB SD card
- Quick Start Guide
- Detailed Instructions (107 page English version 107 pages. Also has 5 other translations including French, Spanish and German)
UK Availability:The Olympus LS-20M is available from around £200. The online suppliers we've found are: |
Olympus LS-20 Specification
- Dimensions: 135mm x 63mm x 18.1mm (without protrusions)
- Weight: 154 g (including battery and SD card)
- Stereo Microphone array
- Lens Focal length f4.1mm, 16:9 at 49mm, 4:3 at 59mm
- Digital zoom Max. 4x
- Shooting range 30cm to ∞
- Photometric system. Digital ESP metering, spot metering system.
- 1/4" 5-megapixel CMOS sensor
- LCD 2.0 colour display Monitor
- No. of effective pixels: 2,930, 000 pixels (16:9) 2,190,000 pixels (4:3)
- Built-in speaker
- Power requirements: Lithium-ion Battery (LI-42B) or 5v AC adapter (F-3AC)
- Recording Medium SD cards 1 GB to 32 GB
- Recording time in Record Shooting mode (Audio & Visual). Obviously this will vary depending on the choices made by the user when selecting the appropriate quality (Sample rate, bit rate and format as well as the size, amount and length of recordings) but these range from approximately: - 7 minutes at 96kHz/24bit 1920x1080 30fps with a 1GB SD card. 4 hours at 96kHz/24bit 1920x1080 30fps with a 32GB SD card. 30 minutes at 44.1kHz/256kbps 640x480 30fps with a 1GB SD card. 19 hours at 44.1kHz/256kbps 640x480 30fps with a 32GB SD card.
- Recording time in Record mode (Audio only). Obviously this will vary depending on the choices made by the user when selecting the appropriate quality (Sample rate, bit rate and format as well as the size, amount and length of recordings) but these range from approximately: - 25 minutes at 96kHz/24bit with a 1GB SD card. 15 hours 20 minutes at 96kHz/24bit with a 32GB SD card. 8 hours 30 minutes at 44.1kHz/256kbps with a 1GB SD card. 270 hours at 44.1kHz/256kbps with a 32GB SD card.
- Voice Recording Formats Linear PCM and MP3 (MPEG 1 Audio Layer 3)
- Movie Recording Format MOV (MPEG - 4AVC/H.264)
- Sampling Frequency (linear PCM format) 44.1kHz / 48kHz / 88.2kHz / 96kHz
- Sampling Frequency (MP3 format) 44.1kHz - 320kbps / 44.1kHz - 256kbps
- Recording: Frequency Response of built-in microphone: 60Hz - 20kHz (the upper limit will vary when recording in MP3 format dependent on recording mode)
- Playback: 20Hz - 20kHz
- Microphone jack frequency response dependent on recording settings ranges between: - 20Hz - 44kHz Linear PCM format 96kHz/24bit 50Hz - 20kHz MP3 format 44.1Hz/256kbps
- Mic/Line Input Jack.
- Earphone output.
- USB micro connector
- HDMI micro connector (type D)
- Battery life in Record Movie mode (Audio & Visual) using the built-in microphone. Obviously this will vary depending on the choices made by the user when selecting the appropriate quality (Sample rate, bit rate and format) for the recording to be made but these range from approximately: - 1 hour 5 minutes at 96kHz/24bit 1920x1080 30fps Linear PCM format - 1 hour 20 minutes at 44.1kHz/256kbps 640x480 30fps MP3 format.
- Battery life in Playback Movie mode (Audio & Visual) using the built-in speaker or earphone. Obviously this will vary depending on the choices made by the user when selecting the appropriate quality (Sample rate, bit rate and format) in the recording process but these range from approximately: - 2 hours at 96kHz/24bit 1920x1080 30fps Linear PCM format - 2 hours 25 minutes at 44.1kHz/256kbps 640x480 30fps MP3 format.
- Battery life in Record Voice mode (Only Recording Audio) using the built-in microphone. Obviously this will vary depending on the choices made by the user when selecting the appropriate quality (Sample rate, bit rate and format) for the recording but these range from approximately: - 3 hours 45 minutes at 96kHz/24bit Linear PCM format - 4 hours at 44.1kHz/256kbps MP3 format.
- Battery life in Playback Voice mode (Only Recording Audio) using the built-in speaker. Obviously this will vary depending on the choices made by the user when selecting the appropriate quality (Sample rate, bit rate and format) for the recording but these range from approximately: - 4 hours 15 minutes at 96kHz/24bit Linear PCM format - 4 hours 30 minutes at 44.1kHz/256kbps MP3 format.
- Battery life in Playback Voice mode (Only Recording Audio) using headphone. Obviously this will vary depending on the choices made by the user when selecting the appropriate quality (Sample rate, bit rate and format) for the recording to be made but these range from approximately: - 4 hours 25 minutes at 96kHz/24bit Linear PCM format - 4 hours 35 minutes at 44.1kHz/256kbps MP3 format.
Related Content: